Restricting an Active Directory account for services
Spoiler: Because you can never be sure that an account used by a soft or service will be hijacked, it is useful to fine-tune these special accounts to restrict their possibilities. We’ll create an Organisational Unit and a specific group to be used as the main group, then restrict the machines and connection times. To make things easier next time, we’ll also show you how to copy the account.
When you have several machines running Windows, having a domain controller can be handy for managing them and providing an account for your friendly users. You can then create groups, manage rights, etc. and users can use any machine and connect to services…
But there comes a time when one of the services needs an account on the domain to work…
The mibox to set up a file share and play videos on the NAS?
Gitlab, matomo, nextcloud and cie. to authenticate users via LDAP(s)?
Even if we trust the developers to do an excellent job, we still prefer to be careful and only provide services with a minimal account. If it’s compromised, it can’t be used as a springboard (or as little as possible, we hope).
Thanks : to Unysoft Consulting for proofreading and advice 😀.
Create an Organizational Unit
If you’ve done things right, you should already have a domain with its own organizational units (by type, geographical area or whatever sorting system you’ve chosen).
We’re going to add one, directly at the root of your domain. This way, there’s no risk of a GPO applying to it and giving it unforeseen possibilities.
To do this, launch the users and computers manager. In the left-hand zone, right-click on your domain and choose ‘New’ then ‘Organizational unit’.
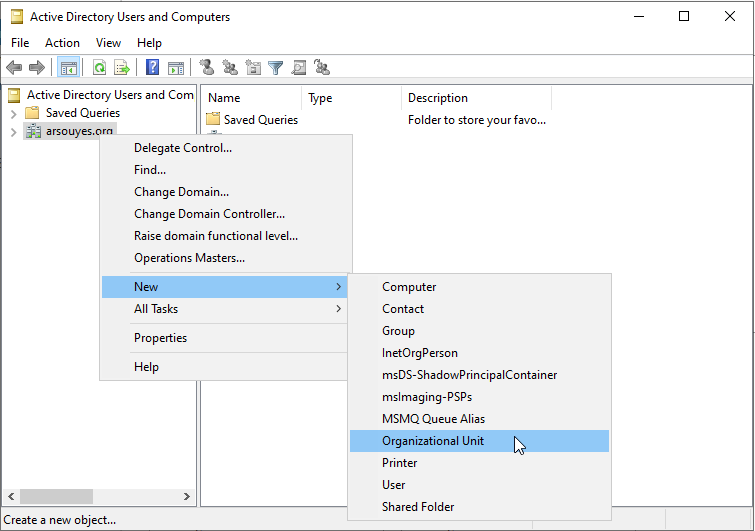
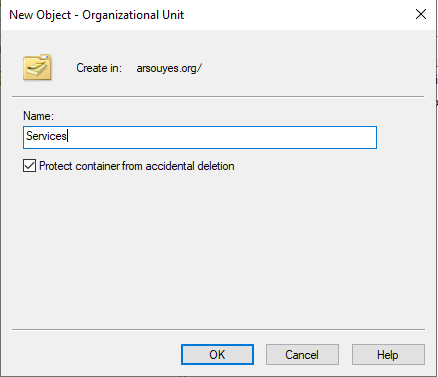
A new windows opens and ask for a name. Enter one (we choose “Services”), but choose as you want).
Create a group
As we already said, a OU is not enough, we will create a group inside.
Always in Users and Computers manager, select you OU and right click. Choose “New”, then “Group.”
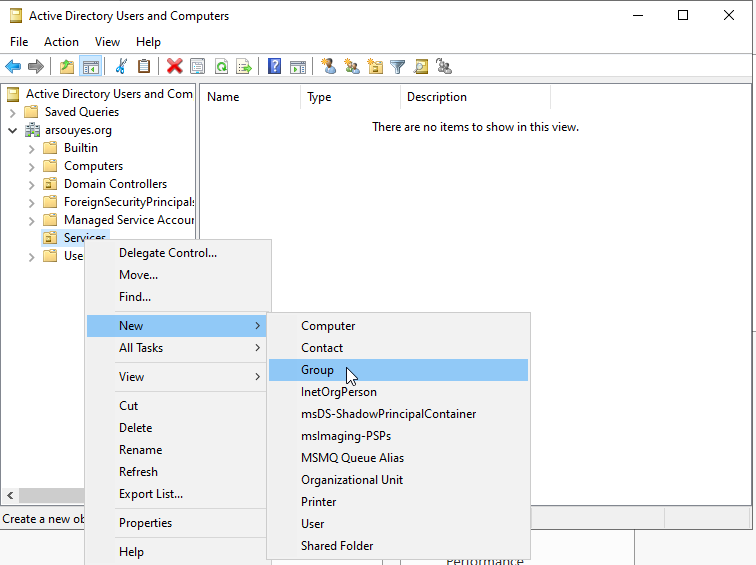
The new window asks for a name (we put “NoPrivileges”, but it is as you wants). The remain can be left as it is.
I know it is a little weird to put a ‘s’ (plural) when there is nothing. Nut I like it like this. 🙃.
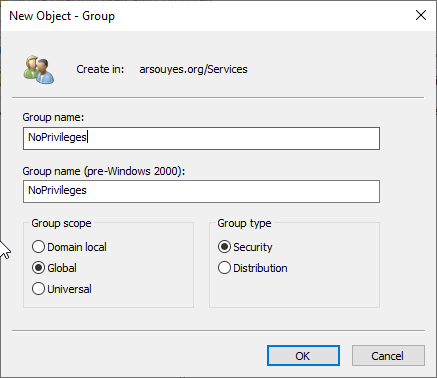
You can want to create a an extended “Local domain”. The idea is good in principle, but will annoy you, when you will want to user it as a main group, because it is not allowed (only global groups can be main)
Create an account
Now, we can create an account in our OU. Restrictions will be done after.
First of all : As we will see later, this account will not be used directly for a service but as a basis from which other accounts will be created.
Inside Users and Computers manager, select your OU and right-click. Choose “New” then “User”.
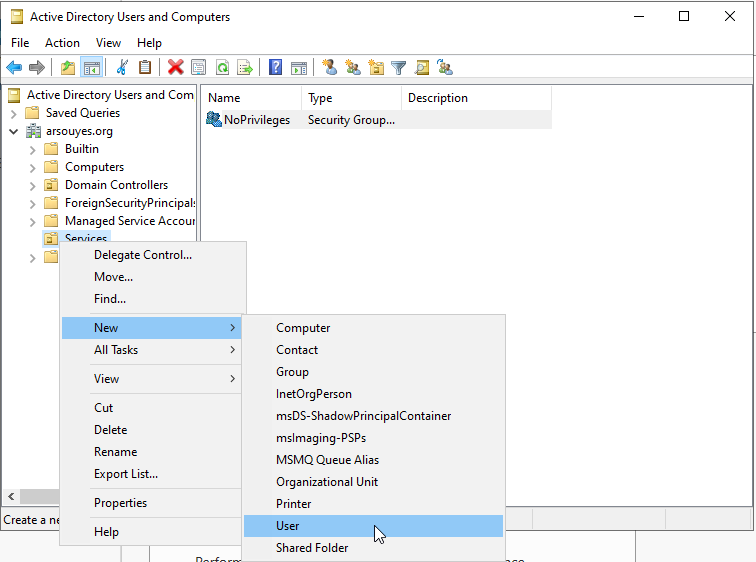
Another window opens and asks for the first parameters in order to identify the user. As it is an account for services, it useless to fill all informations. Just First Name and logon name are mandatory.
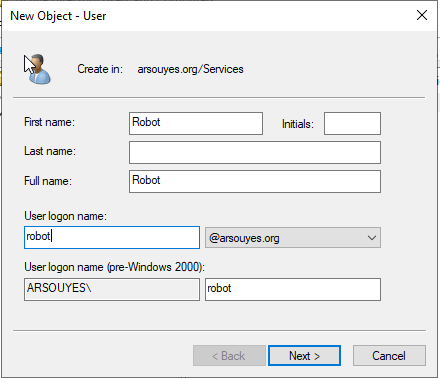
The window then asks you to set the password. A little more work this time:
You need to enter the password (twice to avoid typing errors),
Uncheck the first box (and avoid a request to change the password on the first connection)
Check the third so that the password doesn’t expire (and avoid a service going down at the wrong time, I prefer to plan these changes during a quiet moment).
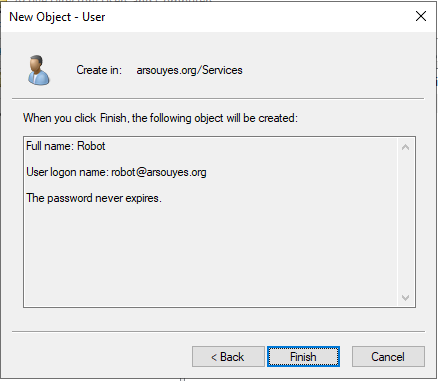
The window finally gives you a summary and you’re done.
Restricting the account
Even though the presence of the account in your specific OU does a few things, we’re going to go a step further.
Restrict the main group
The first restriction will be to delete the domain users account and prevent them from accessing the usual user functions.
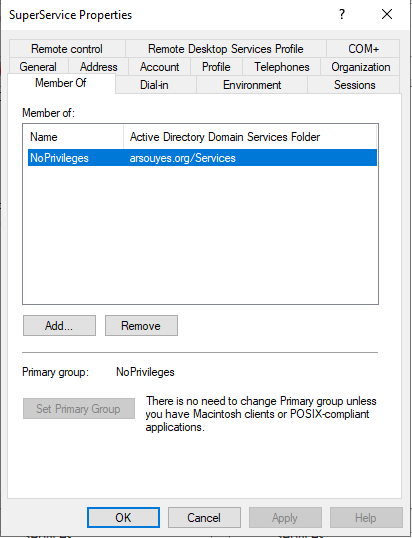
From the user manager, select the account you want to restrict, right-click and choose ‘Properties’. Navigate to the ‘Member of’ tab.
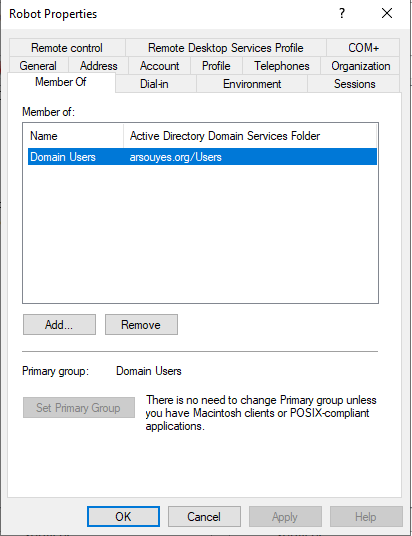
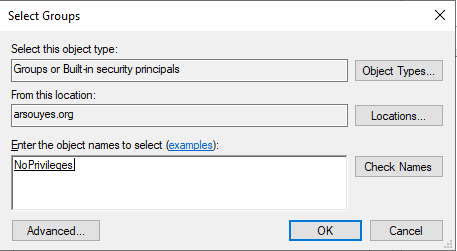
At the bottom of the list of groups (just one at the moment), click on the ‘Add…’ button. In the new window, enter the name of the group (NoPrivileges) and click OK.
Back in the account properties, select the restricted group
(NoPrivileges) then click on the ‘Set Primary group’
button.
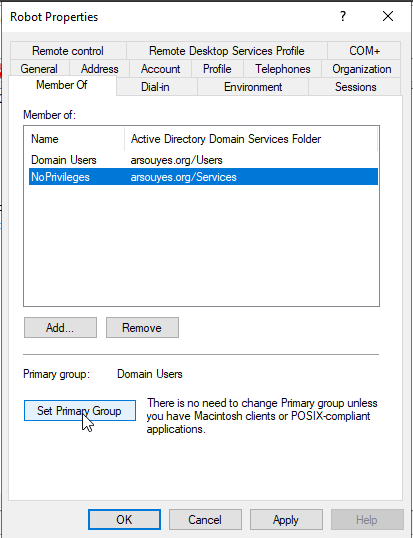
You can now click on the ‘Domain users’ group and then on the ‘Remove’ button.
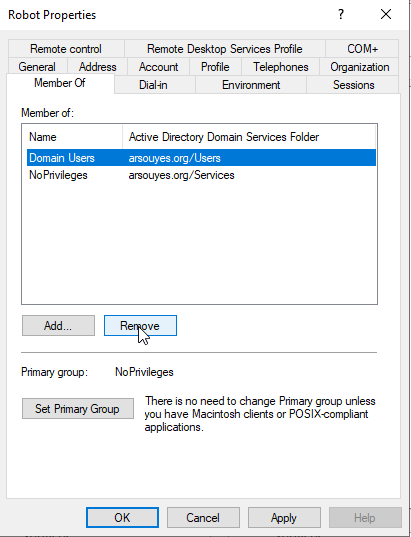
To avoid problems, the system will ask you to confirm.
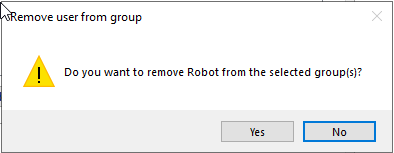
The account is now restricted to the NoPrivileges group
and will no longer have access to the usual account functions. Click OK
to finish.
Restrict computers
To continue the paranoia, we’re now going to restrict, by name, the machines accessible by the account.
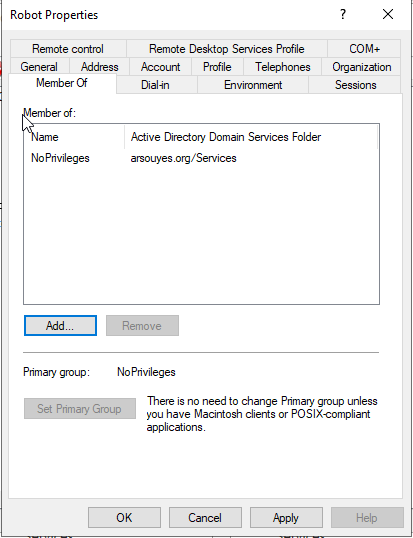
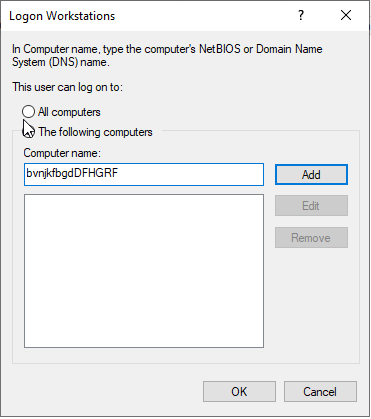
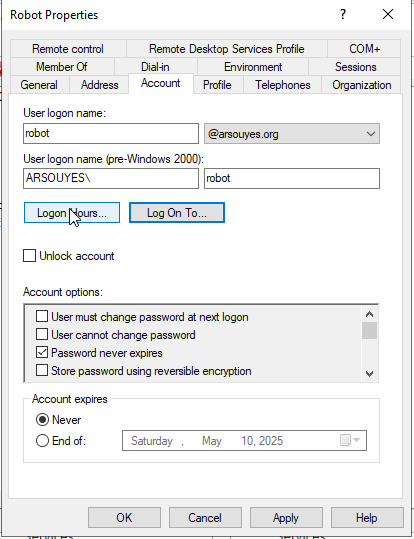
To do this, and if you haven’t already done so, open the account properties, go to the third “account” tab and click on the “Log on to…” button.
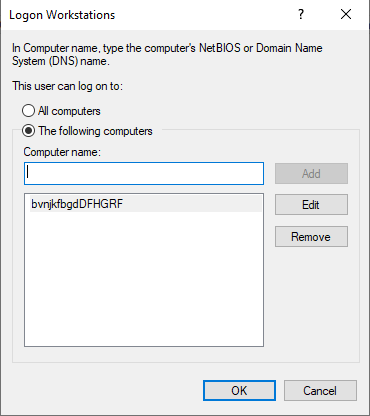
We then tick the ‘The following computers’ box and enter the names of the computers to which the account is authorised to connect:
LDAP: if this is an account that connects to your LDAP (to authenticate users on its service), enter the name of your domain controller.
NAS: if this is an account that opens network shares, enter the name of the client machines (for nextcloud: the server that hosts it and for kodi on the mibox:
localhost).None: if your account does not connect to any machine, enter a name that you know will never be used (otherwise the setting is ignored and the account can connect anywhere).
You might ask, “What’s the point of an account that doesn’t connect anywhere? As I’ll tell you later, it’s useful as a “template” when you create new accounts by copying this one.
You can then check that the name has been added and click ‘OK’ to complete the setting.
Restricting hours
Optional in many cases, but very relevant if you want to reinforce the right to disconnect (or force some form of parental control), you can restrict the account’s connection times.
Good to know… Services using these accounts will therefore be unavailable outside these times.
Still via the account properties screen and the same third “Account” tab, this time click on the “Logon Hours…” button.
In the new window, select the times that are available or not, then tick the corresponding box. Once you are satisfied, click OK.
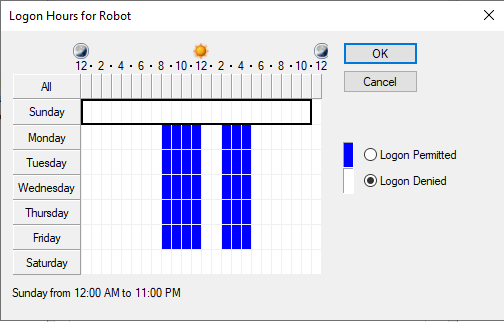
One of the advantages of this setting is that, if the account is hijacked, attempts to connect outside these times will be logged and provide an indication that your network may have been compromised.
Copy an account
As you’re not sure you’ll remember all these steps (and you don’t necessarily want to go through them again), the idea is to copy an account when you want to create a new one.
Note: this technique also works very well for creating new real users.
From the user manager, right-click on the restricted account you created earlier and choose ‘Copy…’.
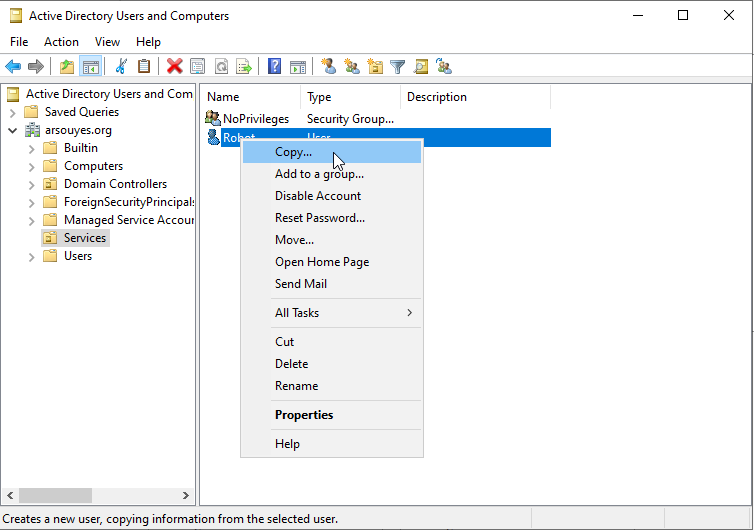
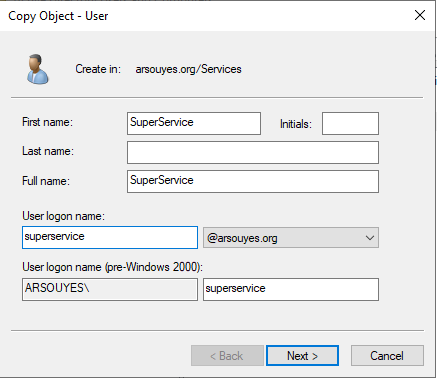
Now enter your identification details (first name and login name).
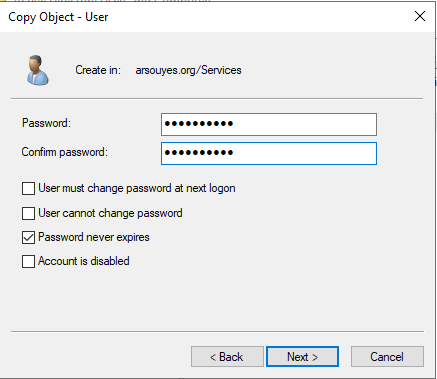
Then enter the password (twice, as always). You’ll notice that the checkboxes are already in the right state (since it’s a copy).
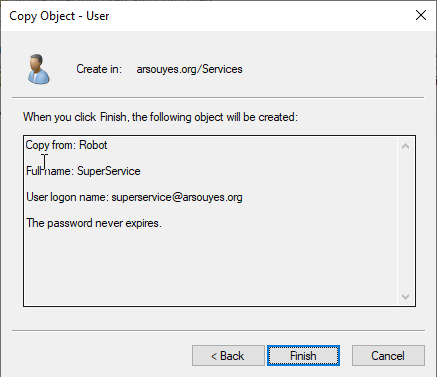
The window shows you the summary and you’re done.
Your new account is as restricted as the basic one. If you want, you
can view its properties, the ‘Member of’ tab will already be configured
to contain only NoPrivileges.
The other account restrictions (machine and times) are also copied but I won’t show you the corresponding screenshots, trust me.
And now ?
You can now use this account for any services that need to connect to your domain controller.
- Setup LDAPs and TLS on an Active Directory
-
November 2nd 2020 Centralizing authentication is good, but protecting these communications is better. Because, by default, Active Directory does not use TLS, we will provide it with a specific certificate (and its key) so it will use it automatically at startup.