Clone a hard drive on Ubuntu
Spoiler: Whether it is following the purchase of a new disk, to make a backup, or any other reason, you want to copy, identically, the contents of a hard disk or a USB key. But, as you can never be too careful, your best bet is to make sure that you don't touch the original. We show you how to do it on Ubuntu Desktop. We start by disabling automount. Then, we will make a cryptographic fingerprint of the device before copying it thanks to dd. Thanks to the cryptographic fingerprint, we can then verify that the copy went well.
During an expertise, when we have to carry out an investigation on a part of a file, it is important to keep it intact.
Imagine ... You open your seal, plug in the hard drive it contained. A false manipulation, and presto! Evidence disappears...

Before any action, it is therefore essential to copy hard disks and other USB keys, in order to be able to work on these copies with peace of mind.
So we'll show you how to do it using Ubuntu.
Disable automount
Do not plug in your drive yet!
In order to avoid modifying anything without doing it on purpose, the
first thing to do is to turn off automount. For that, we need to install
the dconf-editor package
sudo apt-get install dconf-editor
dconf-editoris a graphical interface tool, allowing you to manage configuration variables. The equivalent command line tool isgsettings.
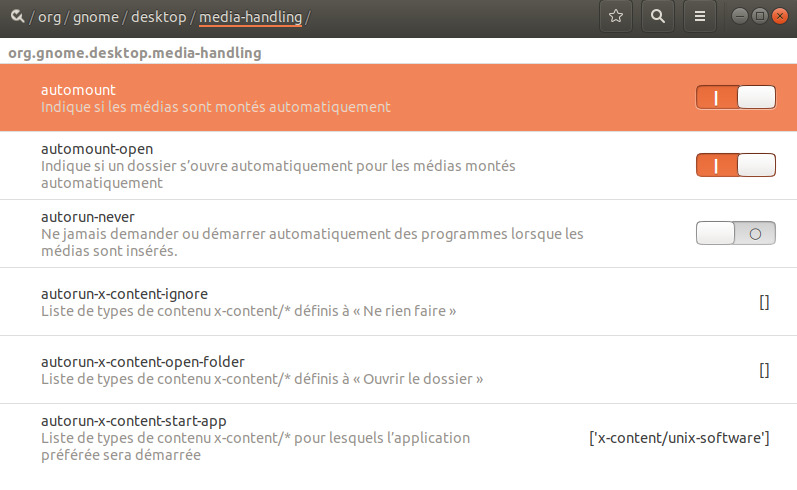
Start dconf-editor. Navigate to
org.gnome.desktop.media-handling. From here you can disable
automatic mounting of removable media, by changing
automount from I to O.

Locate your disc
You are now sure that your drive will not mount on its own, and that improper handling will not affect anything. You can therefore plug in your disk.
Shut down your PC, plug in your drive, restart.
You will need to identify which device your disk corresponds to. For
that, we use fdisk, which we ask to list all existing
partitions.
sudo fdisk -lSATA and SSD hard drives are in /dev/sd…, IDE drives
/dev/hd…. Use what you know about your hard drive to find
it (using its size, installed OS, etc.).
I am trying to locate a 32GB USB key containing my data to be investigated...
After using
fdisk, I spot two interesting devices, one in/dev/sdaand the other in/dev/sdb. By observing the details, including size and OS, I can see that the 240GB SSD hard drive my Linux is running on is in/dev/sdaand that my 32Gb USB key, formatted for Windows, can be found in/dev/sdb.Disque /dev/sda : 223,6 GiB, 240057409536 octets, 468862128 secteurs Unités : secteur de 1 × 512 = 512 octets Taille de secteur (logique / physique) : 512 octets / 512 octets taille d'E/S (minimale / optimale) : 512 octets / 512 octets Type d'étiquette de disque : dos Identifiant de disque : ---- Périphérique Amorçage Début Fin Secteurs Taille Id Type /dev/sda1 * 2048 468860927 468858880 223,6G 83 Linux Disque /dev/sdb : 29,3 GiB, 31457280000 octets, 61440000 secteurs Unités : secteur de 1 × 512 = 512 octets Taille de secteur (logique / physique) : 512 octets / 512 octets taille d'E/S (minimale / optimale) : 512 octets / 512 octets Type d'étiquette de disque : dos Identifiant de disque : ---- Périphérique Amorçage Début Fin Secteurs Taille Id Type /dev/sdb1 * 64 61439999 61439936 29,3G b W95 FAT32As the display uses GiB, or Gibibytes, the values are slightly lower than those in GB.
Calculate the checksum
In order to be able to check if data has been modified, we will calculate the checksum. By comparing the result before and after the manipulation, it will be checked that no data has been altered.
We will use the hash function sha256sum, coupled
todd. On the one hand, because it is installed by default
on Ubuntu, and on the other hand, because ANSSI (French National Agency
for the Security of Information Systems) recommends it for cryptographic
fingerprints.
HashRule-2. For use beyond 2020, the minimum size of fingerprints generated by a hash function is 256 bits.
The SHA-256 hash mechanism defined in FIPS 180-2 complies with the standard .
Référenciel Général de Sécurité, ANSSI
By putting in (if) your device and sending the output to
sha256sum, we get the SHA-256 fingerprint of the device.
sudo dd if=device |sha256sum In my case :
time sudo dd if=/dev/sdb |sha256sum
61440000+0 enregistrements lus
61440000+0 enregistrements écrits
31457280000 bytes (31 GB, 29 GiB) copied, 1773,13 s, 17,7 MB/s
e3375bb22d59233757cbcb24d7f4ffa7b25eaff40e60e40f42f3a22435bf2655  -

real    29m33,203s
user    12m44,728s
sys    4m15,840s
Using
time, we can see that to calculate the footprint of my 32GB key, it took about 30 minutes. Good to know when you have a 1TB drive.
Cloning the hard drive
We plugged in the device, making sure we couldn't do anything stupid
and made a fingerprint, all we have to do is clone it. For that, we use
again dd with the following command:
sudo dd if=device of=fichier.iso conv=notrunc,noerror status=progressWhere the parameters have the following meaning:
- device is your device, in the case of my USB key,
/dev/sdb - fichier.iso is the image file where my device will be cloned,
- conv=notrunc,noerror mean not to truncate the output file and to continue in case of error,
- status=progress lets me know where I am in my copy.
Still in the case of my USB key
time sudo  dd if=/dev/sdb of=clef.iso conv=notrunc,noerror status=progress
31444406272 bytes (31 GB, 29 GiB) copied, 1981 s, 15,9 MB/s
61440000+0 enregistrements lus
61440000+0 enregistrements écrits
31457280000 bytes (31 GB, 29 GiB) copied, 1981,74 s, 15,9 MB/s

real    33m4,898s
user    1m36,367s
sys    11m27,615s
Note that it took me another half hour ...
Check integrity
Our copy is made, we will calculate a new device footprint, in order to verify that it was not altered during the copy. Let's also check that the copy conforms to the original.
To do this, we simply reuse the command for everything on time, on the device, then on its copy. And finally we compare the fingerprints.
sudo dd if=device |sha256sum On the USB key, to make sure that it has not been touched.
time sudo dd if=/dev/sdb |sha256sum
[sudo] Mot de passe de arsouyes :
61440000+0 enregistrements lus
61440000+0 enregistrements écrits
31457280000 bytes (31 GB, 29 GiB) copied, 1755,58 s, 17,9 MB/s
e3375bb22d59233757cbcb24d7f4ffa7b25eaff40e60e40f42f3a22435bf2655  -

real    29m18,712s
user    10m34,172s
sys    3m37,959s
Then, on the ISO to check that the copy is true to the original:
time sudo dd if=clef.iso |sha256sum
[sudo] Mot de passe de arsouyes :
61440000+0 enregistrements lus
61440000+0 enregistrements écrits
31457280000 bytes (31 GB, 29 GiB) copied, 1111,31 s, 28,3 MB/s
e3375bb22d59233757cbcb24d7f4ffa7b25eaff40e60e40f42f3a22435bf2655  -

real    18m34,487s
user    10m2,526s
sys    3m56,255s
Here, bingo, they are quite identical.
Altered data would be detected by a different sha256:
- If that of the iso file is different, I advise you to redo the copy.
- If that of the disc after copying is different, your disc has been corrupted, you could use ISO to overwrite the original disc.
- If the two differ, it is too late and if it matters, you may have to look at where they differ.
You can also put the initial fingerprint in a file (for example Initial_CHECKSUM) and calculate the fingerprint with the
-coption as follows:sudo dd if=device | sha256sum -c Initial_CHECKSUMWhere
deviceis either your iso file or your device (depending on what you want to do).If the fingerprint is the same, you will get a nice little
OKoutput, but if the fingerprint is different, you will get aFAILEDfollowed bysha256sum: WARNING: 1 computed checksum did NOT match.
And after ?
Now that you have a beautiful copy of your device, you will be able to replace your original in its small bag and close your seal.
If you are not a forensic expert and don’t have to deal with seals, you can still be proud that you didn’t change anything on your original record.